It has taken some time for this follow-up post to make its way onto the website, but here it is finally – the second half to complete the first installment of New PC Build – Gaming PC For Fun… And Work. Why did it take so long for me to post this second half on how to build a moderate gaming PC? Well, after being on the old computer for over the last 7 years, it took some time to get over the initial excitement of this brand new build and all the fun of having a fast and decently powerful gaming rig.
Having built several other systems in the past, it is still quite rewarding, after having put all the components together, closing up the case and connecting the peripherals, to press the power button and have the system come to life and light up the new monitor. Well, in this particular case that is not exactly what happened after connecting the power cord, but I am getting ahead of myself…
Motherboard
So all the parts we had researched and priced out have been ordered and had arrived as expected, so no surprises there. After verifying that all was in order, it was time to get down to business and start putting this PC together.
So first order of business was unboxing the motherboard and mounting it inside the case. One approach I have seen in the past is to leave the motherboard outside the case and attach the various components first. Nothing wrong with that, but I prefer to have the motherboard firmly fixed inside the case which in our build was roomy enough to work inside of it.

If the case you are using is a bit tight to maneuver inside of when attaching components, then the other approach of mounting them on the motherboard first may be warranted. Something you get a feel for as you build more systems and get exposed to a variety of configurations.
Each PC case will have its own quirks or limitations.
CPU And Cooler
The next step after mounting the motherboard inside the case was to install the new CPU and its cooler. No special concerns with installing the CPU other than being extra careful not to bend or otherwise damage the tiny pins on the back. The CPU cooler and fan were a bit different than what I am used to due to their size and mounting process. Take a look at this bad boy:


The tricky part was getting the mounting bracket (pictured above) adjusted so it would allow securely attaching the CPU cooler and fan. After fiddling with the parts for a bit, we were finally able to get it just right to make sure nothing wiggled around and no wires got in the way. Here’s what it ended up looking like inside the case:

As you can see from the above image, the CPU fan and cooler took up pretty much all the depth of the case, so there was some concern whether we would be able to close the case with all those pins sticking out. So this is where all our previous research paid off ensuring all the pieces would fit.
Power Supply And Cables
Having learned from experience during my previous builds and since the price difference was not that much, I decided to opt for a modular power supply. This way I would only have to attach those cables that I would need for my components, which would help minimize clutter and increase air flow inside the case.


Installing the power supply without any cables attached was a cinch, but due to its placement inside the case and proximity to the internal cage, working with cables later on proved somewhat challenging, requiring us to pull the power supply out of the case a bit to allow for better access and visibility of the connectors. This should hopefully illustrate what I am trying to describe:

Video Card
The next most exciting component to go in was the graphics card. Again, this was a bit of a departure from the typical video cards I had used for other builds (non-gaming rigs). This MSI GeForce GTX 1060 card was huge! I was glad we took the time to ensure it would fit comfortably in the PC case without interfering with any of the other components. Although I do have to mention that it took some trial and error when it came to routing some cables around this card.


Other Components And…
Installing the rest of the components was pretty straightforward, except where it required some fiddling with the cables getting them connected to the right places at the power supply as mentioned earlier. So this got us through the installation of the two drives (SSD and HDD) and RAM.
So the end was in sight, and we were quite excited to see the pieces fall into place as this build was coming together and all that was left for us to do was to connect the external cables and press the power button. So it was quite deflating when after all that work what happened was… exactly nothing. No lights, sounds or other signs of life from this shiny new box manifested themselves as we repeatedly hit that power button.
So what do you do at this point? Well, you start checking all those internal cables and connections. At first, we suspected the power supply cabling not being properly connected. This led to some real frustration as having to recheck the cables going to the right connectors required pulling out the PSU once again. So not to bore you with all the details, after some more trial and error, we finally tracked down the source of the problem.
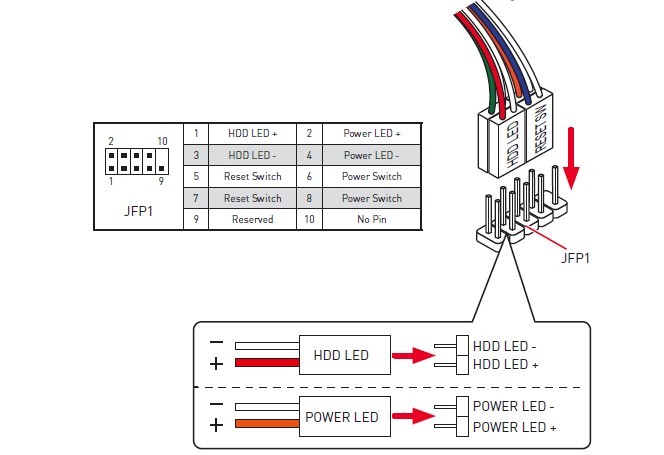
Of course, it was something simple but really easy to get wrong if you don’t get the details exactly right. Looking at the instructions for the motherboard, it was not really clear how the front panel header cables were supposed to be connected. At least, not at first. Even attaching them to the correct pins but not facing the right way meant that they would not work. Hard to explain, so here’s the diagram we had to rely on:

Having rechecked the header cables and correcting our previous mistakes finally enabled the system to boot about 10 minutes after we almost threw the power supply through the window. So as usual, it’s “little” details like this that trip you up right before you are so ready for those lights and (fan) sounds to come to life. I am going to chalk it up to being rusty after a long break from building systems, so this was definitely a good refresher and a test of our troubleshooting skills.
I am curious if any of you having read this and the previous part of this series, have similar experiences to share. As always, your comments and ideas would be much appreciated, so please feel free to add your thoughts in the comments area below.